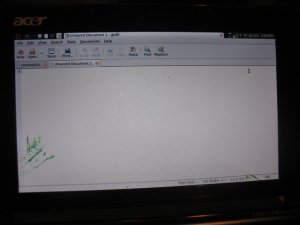
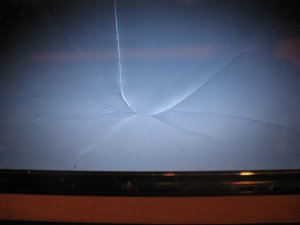
The other day I opened my pride-and-joy to discover, horror of horrors, a Matrix-like green splotch of dead pixels, precipitated by a large crack in the LCD. Apparently my almost total disregard for the well-being of my electronic devices is not without its consequences.
Although the patches of dead pixels are relatively small, when the screen itself is only 8.9″, that’s a significant chunk of screen real-estate! Now, the good thing about netbooks is that they are relatively cheap, but not quite cheap enough to treat like disposable appliances! So I began to search for a replacement screen, and to my great pleasure found a company selling super-cheap authentic replacement screens based in Vancouver: ScreenCountry.com, where I was able to buy a screen, complete with shipping, for about $90. And it arrived within 36 hours of me ordering!
Now everywhere I read said that replacing LCD screens is a simple process, but for the life of me I couldn’t find any guides for the Acer Aspire One. But being an enterprising sort of chap I thought I’d dive in anyways, and hopefully pass on my wisdom to others who might find themselves in a similar predicament. The process is really simple and doesn’t require any technical skill beyond a steady hand. Here, then, without further ado are the steps needed to replace the LCD on you Acer Aspire One:
Disclaimer: This is an easy process, but by providing these instructions I accept no liability for damage to your netbook which might result from your attempts to follow these instructions.
Before you do any of this, make sure to turn off the computer and remove the battery!
- The screen is flanked by 6 rubber tabs which mask the screws which hold the LCD in place, illustrated below. These need to be removed – scraping them off with a flat-head screwdriver or something similar (even your fingernail) will do the trick. Keep these somewhere safe to be reapplied later if you wish.
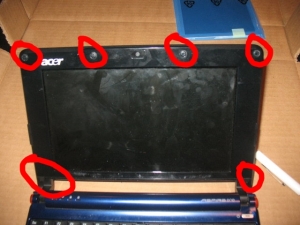
- Now that the screws are exposed they should be removed. Make sure to user a properly sized screwdriver and to apply enough force to ensure you don’t strip the screws. Make sure to keep the screws in a safe place for later use.
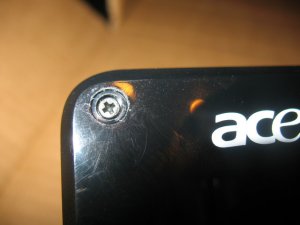
- The next thing to do is remove the black plastic sheath surrounding the screen (the part with Acer written on it). Pry it from the backing section by inserting a flat-head screwdriver or something similar. It need to be popped out near the bottom (where the screen attaches to the body of the netbook), but should pop right out. Just be careful not to crack the plastic. Once this is removed the LCD screen and its attachments will be exposed.
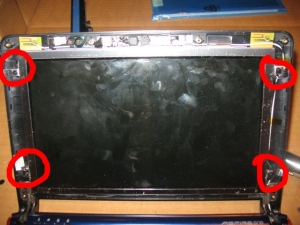
- The LCD is attached by four screw brackets, circled above. Each of these brackets have two screws, and for a bent L-shape. Remove ONLY the screw attached to the actual LCD, leaving the bracket attached to the netbook. Do this for all four brackets. Make sure to keep these screws seperate to those which were around the edge of the plastic as they are a different size.
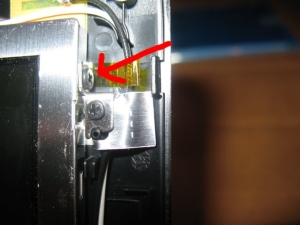
- Now that the screws have been removed the LCD can be lifted off the back plate. This will make it apparent that the LCD is attached by three sets of wires to three plastic clips. These clips, which are shown below, need to be removed. The replacement LCD will have it’s own set of clips which will be attached in the same manner to the wires from the computer.
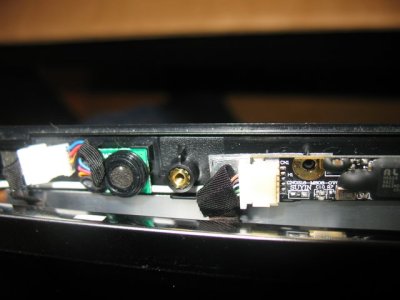
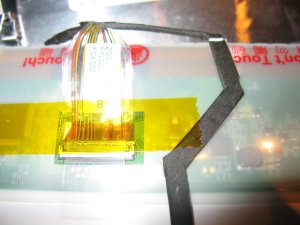
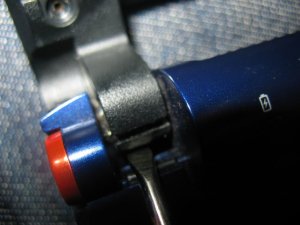
- Now out with the old (LCD) and in with the new! Attach the wires of the new LCD in the same manner that the old was attached, slide it into place, and replace the screws through the side brackets. You can then reattach the plastic edge around the LCD, using a screwdriver to pop the plastic tabs at the bottom into place (see picture below), and replace the six screws around the side. If you have the right sort of glue (Im not sure what this is…) you can reattach the rubber tabs too, but I didn’t bother – I kinda like the look of the visible screws!
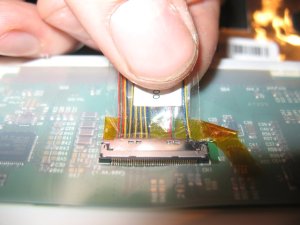
- Now the new LCD should work! wOOt!

All done! Now all I need to do is think of something cool to do with the old, slightly damaged LCD. Any ideas?

THANK YOU! Easy, Easy, Easy!
Thanks!
Dropped mine 2 feet onto a thick carpet . . . of course, it landed on the corner of the screen, cracking it. I got a replacement for under $50 US on E-Bay.
Simple to replace, although getting the screws that hold the screen back in without cross-threading them is a bit of an exercise.
New screen is great.
Now, does anyone know where to get replacement rubber feet for the bottom???
thanks for the hints, i kinda figured it would be easy but was looking for a headstart. it was super easy to swap out the screens.
I did get a bit worried when pulling the ribbon cable from the old screen.. i think I may have even damaged a pin..but wasn’t enough to stop it from working. works great.
Thanks a bunch! Love guides like these. Took me about 15-20 minutes tops. You should update you instructions though, I thought the new screen would have new wires too, took me a minute to figure out that the whole wire harness is reused (you say “The replacement LCD will have it’s own set of wire which will be attached in the same manner.”) I think you meant to say clips not wire.
Good point, I’ve changed it – Thanks!
You know, it looks like the two clips at the top are not for the screen at all, but for the microphone and camera, respectively. I think I may have damaged the microphone clip trying to disconnect it, only to find out that it just needed to be reconnected again.
I’d suggest not disconnecting these clips at all – just carefully pulling the wires away from the back of the screen until the lower clip is exposed.
Anyone have any tips on reattaching wires to clips?
Thanks for the push start. I have had the screen off (a 10inch instead of 9 inch) and it was very easy. I was intending on using the supplier you suggested but am having problems matching all the numbers on the back of my screen to a model number published on ScreenCountry. Any insight you might have would be appreciated.
Never mind. I found the correct model number and have placed my order.
I can’t thank you enough for posting how to change out the screen on an Aspire One. My son and I tackled the project and your instructions made it really easy.
I feel fortunate to have found your site and instructions. Interestingly, after my LCD screen had broke only a month old, I took it back to where I bought it. A broken LCD isn’t part of standard warranty, and I didn’t buy the extendo-warranty. The guy at the store told me to just junk it out on Ebay for parts. Ha! thanks again!
Hey, I have to ask you, were the files you had lost during the replacement of your LCD screen? Because I have a cracked screen as well, and I just wanted to know if I had a risk.
No, replacing the LCD will not affect the files on your Hard Drive.
^^ Thanks.
In a week or so I’m going to take a crack (pun intended) at fixing the screen on my daughter’s Aspire One. Your step by step instructions appear to be most extensive. Thanks for posting them.
My question, however, involves the removal of the buttons on the bezel. I’m not expecting difficulty from the ones on the top of the bezel, but the ones at the bottom near the hinges seem of a different type. They are flush with the bezel. Is there a tip on removing them?
Just scrape ’em off using a flat-head screwdriver, starting with the flat edge of the button. Good luck!
Mr Fitzgerald…God bless you! There I was online (obviously on another computer) researching where, and how much it was going to cost me to repair the cracked screen of my Acer One, when lo and behold I caught a glimpse of your blog page. The repair cost were approximately what I paid for the little “puter”! The option was simple…check your blog. I’ll be honest, I was a “doubtful Thomas” until I saw all the responses, and your step-by-step photographs. I haven’t even bought a screen! Your updates and kindness in sharing your knowledge simply put, “blew me the heck away.” I figure, what the heck, grabbed some tools, and here I sit smiling…I DID IT…thanks to you, I took the l’il sucker apart! Next stop…buying a screen, and updating you on the results from the repaired computer.
PS. One, you can take the rubber screw plugs out by inserting a sewing needle around the edge, and gently lifting them out…they maintain the glue on them that way, and can be reinserted with the original glue. I also used the needle to begin prying the casing apart. Two, Between the inverter clips on top (which I never found; they were attached with double-sided tape), and the one bottom wire, I only had me an inch of work space…whew, scary…I managed it again by releasing it with…yes, the needle…LOL! Thanks again…hope this makes you wanta sing! 😉
@ Larry I had this same problem with my Acer. There were screws at the top left and right corners but that was it. The two bezels in the middle top had nothing connected to them and the same with the ones in the bottom corners. I kept working with it and discovered that there was actually screws holding the bottom in place but they were covered by solid plastic with no apparent way of getting to them. I just kept wiggling it (carefully) and the screw holders eventually gave way. The screws wont ever be secured again but it doesn’t hurt the finished look at all. My model is a D250 so if this helps at all, your very welcome. I don’t want anyone else to be dealing with this problem.
Thanks,
I was just sitting here wondering about that.
Solid plastic isn’t going to stop me from getting those screws out.
Fitz- thank you so much for the step-by-step instructions. We gave my daughter a replacement screen for Christmas and it took me about 25 minutes to replace the screen using your instructions. The only hitch for me was sliding the cable into the back of the LCD– I had trouble the first time getting it to “click” but succeeded with a little elbow grease.
Many thanks!
Murph
Thanks,this was very helpful and easy to understand.
Finally got around tp replalcing the daughter’s Acer screen yesterday. Went just as described above. Many thanks for the detailed description otherwise I would never have attempted it. And, the icing on the cake? After the swap, computer worked!
Great page! Saved a lot money on repair. Real good pictures and descriptions are complete without getting wordy. I thank you and my son thanks you! BobW.
I just replaced the screen in my 10″ Acer Aspire One D150 using this blog post a rough guide. Here are some notes on my experience:
Screw Caps: my screen panel has 6 screw caps (4 rubber, 2 plastic), but only 4 screws. The top middle screw caps did not have screws under them. Also, the bottom flat plastic screw caps were a *real pain* to remove.
Glue: my panel was glued to the screen on the inside. This made detaching the front panel very tedious and difficult. I used a thin plastic tool (orange peeler) to scrape the panel away from the LCD underneath and eventually the panel came off.
White screen: while the new LCD seems to work fine when the computer is on, the screen remains on and complete white when the computer is powered off. I don’t know if the white screen is caused by an incompatible screen or if I damaged the cable during replacement. Due to the simple nature of the procedure, I find it hard to believe I damaged anything, especially since the screen works fine when the computer is on. This is frustrating since the ebay auction I won specifically said the screen was for the Acer Aspire One D150.
Anyway, thanks for the post.
How did you manage with the bottom screws? I am not having any luck. Can you break it down for me??
I am having the same problem and the same situation. Did you resolve the problem? How?
after replacing the screen I had the same issue the first time that I turned it on, it scared me a lot, a few seconds later the windows logo came up and everything works as usual. I think tha i can live with that.
I’ve the same problem with my Aspire One A150L. Today I’ve replaced the screen with a Hannstar HSD089IFW1, which I’ve bought on eBay.
The original panel was a B089AW01 V.1 from AU Optronics. If I connect the original display, I’ve no white screens. With the new one, I get white screens: I noticed that’s not possible turn off backlight with this panel.
I replaced the monitor on an Acer today and it works perfectly but i get the same white screen when the computer is completely shut off. Only taking the battery out will make the screen black again. Any suggestions on why the screen is staying white? thank you
have exact same problem bought replacement lcd works fine when acer one is on but when i turn it off the screen is white
any ideas?
thanks!
did you solve the white screen problem!?
Can I get a detailed description of how to move the bottom two screw covers? From the looks of them, scraping isnt going to help. How do I do this??
You should be able to just scrape them off with a flat-head screwdriver, same as the other two covers.
I anticiapted some difficulty as well with the bottom two covers. However, all I did was take a thin blade and they pried right off
I had the same problem. You just have to pry them up. They are attached with hidden screws with no way of undoing them. If you do it carefully, the plastic holding the screws in place will crack slightly without ruining the entire cover. Hope this helps!
Thanks so much nfitzgerald. That was a really good step by step guide. The bottom two covers are a pain in the ass, but the rest is pretty easy to handle.
Regards from Rio de Janeiro, Brazil.
Let me add my name to the list of people who really benefited from this explanation. Thanks!
I have an acer aspire one 10.1″ and I’m having trouble getting the plastic covering off. Unlike your picture, my computer only has the top four rubber things (the two corners being where the screws are. The bottom two however are not screws. How do I get the screen cover off?
I had the same problem. You just have to pry them up. No way around it. They are attached with hidden screws with no way of undoing them. If you do it carefully, the plastic holding the screws in place will crack slightly without ruining the entire cover. Hope this helps!
Pingback: Replacement Netbook Screen - Overclock.net - Overclocking.net
Thanks, took me fifteen minutes.
I recently purchased a lcd screen from the site you suggested: Screencountry.com http://www.screencountry.com for the acer aspire one ZG5, it was incredibly fast service and shipping! Screen was the original manufacturer’s part not an OEM replacement. Great page! Saved me a lots of money on repair. Great pictures and descriptions. My wife thank you!
I bought my screen from LCDScreens.com. I didn’t com with any clips but I didn’t need any. I the only concern I had was when it came to unplugging the strip cable. Was I suppose to pull up on it or what? I just want to say that after the tape has been removed the connector slides down toward the keyboard.
I did al the steps that it explains here and the screen works but I get a split screen! its displays in the upper right corner a square of 6inx 3.5in the next 1.75 in are black and in the lower in of the screen i can see what should be my upper 1in of the screen. Did i do somethign worong? is there a way to fix it?
im having the same problem is there a way to solve it.
I am having the same prob…did u get a resolution?
____________________________________________________________________
re:
I did al the steps that it explains here and the screen works but I get a split screen! its displays in the upper right corner a square of 6inx 3.5in the next 1.75 in are black and in the lower in of the screen i can see what should be my upper 1in of the screen. Did i do somethign worong? is there a way to fix it?
the idea of replacing the screen gave me the willies but having gone through your instructions
i am feeling confident i can handle the chore.thanks a bunch for the info.
the bob
Thanks a lot! Very helpfull. I’ve changed the screen with no problem by following the tutorial.
Thanks. Took me less than 30 minutes!
Your directions were a big help to me! I was quite upset when I found my laptop screen in a brilliant multi-colored starburst after vacation. I immediately found your instructions and felt confident I could do it myself. After a $50 part and about 30 minutes, my Aspire One is back up and running beautifully.
Thanks a million!
HI MAN I HAVE TRIED A LOT OF THINGS I DONT NO WHAT TO DO NOW.MY ASPIRE ONE ZG5 WAS WORKING PEFFECTLY. BUT AFTER I GAVE IT TO A FRIEND WHO TRIED TO FORCE A NEW OPERATING SYSTEM THAT WAS ON A SCRATCHED DISC. THE COMPUTER REJECTED IT BUT HE STILL FORCED IT.THE NEXT THING HE GOT WAS A BLACK SCREEN.AFTER THIS HE THOT THE RAM HAD SEZIED.HE THEN UN SCREWED IT.BUT TO NO HELP. I GOT IT BACK FLASHED THE BIOS. IT STARTED WORKING ONLY WITH A SHRUNK SCREEN BY A BLACK SPACE ON THE LEFT SIDE AND SPLIT AT THE BOTTOM. HELP HOW DO I GET MY FULL SRCREEN BACK.
THANKS IN ADVANCE
Hey thanks dude!! That took me about 20mins and was just as easy as you have explained it here. I still can not believe that I fix it myself! I got quotes from professional computer repair techs, Acer- wanted $350.00 + S&H (Thats more than I paid for the thing), and The Geek Squad wanted around $200.00 + S&H. Both would have had my netbook for atleast 2 weeks. I found the 10.1 glossy screen on ebay for under $60.00 bucks (S&H included) and was up and running in about 20mins! Thanks Again!!
An excellent guide to screen replacement – thanks! But having changed the LCD panel, having taken great care to avoid static discharge, etc I now find (like several others) that the screen is plain white even when the netbook is switched off, until mains power is disconnected and the battery is removed. Booting the computer up turns it black (with a faint glow), but with no display. Works fine with an external monitor. My machine is a AOD250 (KAV60) running XP. Has anyone else got to the bottom of this issue? Have we been sold faulty or incompatible screens? My replacement screen is similar, but not absolutely identical, to the original; is this perhaps a driver problem?
Excellent Guide, well thought out and worded.
A++
-Mus
Excellent guide. Once I got the right screen. First shipment from a guy on E-bay did not work but I got a screen from http://www.acerspareparts.co.uk/ and that works fine.
perfect directions! got my screen replaced in 20 mins! thanks!
side question if you don’t mind: i have a wordpress blog, too, and i really like the plugin you have that puts the “Notify me of follow-up comments via email” and “Notify me of new posts via email” options below each comment box.
Do you mind telling me what the name of this plugin is? You can email me at chafic2783@gmail.com if that’s okay with you. Thanks in advance.
Chafic
Pingback: bluefacedpixie » A strange break in my….
Pingback: Acer Laptop LCD replacement and HOW-TO « John's Blog
To do this do I have to buy a screen with an inverter?
This blog post has been a total boon! THANK YOU SO MUCH!!
You’ve save my day, I was using Skype with my parents showing them how nice my 18 month old son is running around and playing with his toys, when he smashed his push-car into the computer screen, that was it for that conversation, now we can see each other again and my wife can watch her shows on the computer and I can have my computer back. Thanks a lot.
thanks for the guide. i haven’t replaced my screen yet but i’m much more confident knowing what to expect when i open it up.
You are fantastic. Thank you so much!
A got on your website by accident but I am happy I found it because the cracks in my acer are getting worse and worse with red edges.So I will have to replace it soon.I will get back to here,thanx a lot
I have the 10.1 inch Acer like Jasmine and I can’t get the screen cover off. I found the top two screws but the bottom of the screen is attached to the body of the computer and I can’t get it off. Any advice out there? I would really appreciate it. Thanks!
Just pry it up carefully. It’s attached with screws with no apparent way to get to them. Hope this helps!
Took me and my dad about 30 minutes to fix it!
The only trouble we had was removing the bottom two screw covers and the bezel. And the clips are veeeery fragile, so it took us some time managing to reconnect those.
anyway, thank you for the tips!
Best regards from BRAZIL!
Thanks so much! I’m a 50 year old grandma and I just replaced my laptop screen because you were thoughtful enough to post the “how to” here! Everything was just as you pictured and described.
fantastic blog m8ty , done mines within 3 mins 🙂 chuffed , your a star 🙂
greetings from Russia) thanks for the photos, just replaced mine’s AOA110 broken display
Help Me Please, i have acer aspire one D260, its not same as your picture, i even can’t find the rubber or the screw, n if i want to buy lcd, should i know the parts number of my lcd or, i can use another number parts, like lcd aspire one D250, sorry 4 my bad english
Thanks your discription make it very easy.
Just to say on my ZG5 that the clips and cable were part of the old machine. The cable was stuck to the back of the LCD screen. This had just to be pealed off , then restuck ( the old glue was still tacky enough) to the new LCD display. Also the only attachment to the new LCD was a metal multiway connector (as in your photo).Thanks again
Just want to add my thanks for this posting. My screen was mounted slightly differently, but just as simple to remove/reinstall. It probably wouldn’t be a bad idea to photograph as you go along — the placement of the wires near the hinges could cause problems if they are not put back exactly the same. I would not have attempted this job, had I not seen your article.
Super easy! Thanks for the instructions. One thing to note though: the newer ACER Aspire One’s only have 2 screws on the outside near the bottom of the screen. Simply remove those two then pop off the cover.
Acer tried to charge me $99 to do it, but found a replacement on ebay for <$50!
It was a BREEZE! I ordered my new LCD from ScreenCountry.com and it arrived in 3 Days. I followed your instructions and within 30 min my Acre One D250 was working, as good as new.
MY EXPERIENCE: I found the little screw covers at the bottom corners of the screen a pain to get off, and I had trouble getting the ribbon wire to release from the back of the old LCD…but otherwise, it was very straightforward. I did end up using a set of watch repair screw drivers (tiny, thin blades) to remove the screws and to separate the bottom edge of the frame that encases the LCD. Good luck to all and THANK YOU SO MUCH nfitzgerald for taking the time to spell this out for the rest of us!
Thanks for this guide, you just saved me £70! As hmdem mentions above, my wife’s ZG5 also had the clips and cable connected to the machine, so just had to unstick the cable from the old screen and stick it onto the new one, pretty painless.
Very nice guide thanks a lot.I found lcd on ebay for only 55$ include shipment to Norway.Everything is easy when you know how to do it.Without this guide its easy to crack the plastic i think.
May be attempting this in a week or so, if I can determine it’s a bad screen. Your instructions look easy enough to follow. Question b4 i do this: My Aspire One D250-1165 screen works great unless I move (tilt) the screen. Then it blinks and goes white, sometimes with vertical lines. Is it possible the lcd is ok? Is there a connector cable that could be bad and could be replaced. I can’t find anything on the web that refers to a cable for this unit. Thanks again for the great post.
Ed, did you find out? Mine has the same problem, it seems the panel is not properly seated and when it moves a bit it loses connection. The connection cable is not so cheap either, so I’m not sure about replacing it; it doesn’t seem broken, the whole setup is rather fragile so about anything might be the reason why the screen gets black/full of green stripes…
Thank you so much for this step-by-step guide – I was able to replace my laptop screen without my boyfriend! 😀
Thanks, this helped me a lot.
Screencountry plus this post saved the day! Very clear on how the Acer is different from other laptops. Thanks!
When I came back from a trip, I accidentally sat on my acer one in the airplane. When I came home I noticed that the screen was broken.
Knowing how expensive Laptop repair is, I tought it will never work with a screen again, and I have to use it with an external monitor only.
But after reading your instructions, I thought, “I can do that”, and I went ahead and ordered a screen. I actually ordered it on Amazon:
New LG LP089WS1-TLA1 LED Screen For Acer Aspire one 8.9″ All Mini Series Laptops New LG LP089WS1-TLA1 LED Screen For Acer Aspire one 8.9″ All Mini Series Laptops from CDSMICRO.
Thanks to your instructions, I was able to do the whole repair in less then 20 minutes.
My exact model is: ZG5 or AOA 150-1570 (I guess the later is the configuration).
THANK YOU SO MUCH !!!!
I found these instructions very good, and they made my mind: I am going to replace the broken screen of my Aspire One ZG5 AO150 myself. However I was thinking, why stop there? Has anyone replaced the screen with something BETTER than the original? Is there such a beast that would fit and work?
I find the current screen resolution too limiting because some programs such as Civilization IV don’t work with the small resolution.
Generally the computer was made to support a particular resolution, and the screen is just a medium for that. Trying to put in a screen with a higher resolution is like adding a third leg to your body – it’ll be there but you’ll never really be able t use it the way you thought.
Thanks for the walkthrough. Some kid threw his bag on mine during an exam and ruined my screen. I’m going screen hunting with my boyfriend this weekend (so we can avoid shipping) and the guide seems simple enough for me to try.
How do you replace the black and white wire going to the screen as well? The 2 white and black wires also ripped when i dropped the laptop. thx.
Thank you so much…My D260 only had two screws and the bezel just popped right off. Thanks for the confidence booster! Your illustrated instructions were fantastic. I just added another “Why my dad is a hero” mark in my daughter’s diary, thanks to you. Merry Christmas and Happy New Year!
Wahoo! Just got done. You are the bomb!!!
Thanks!
It didn’t work for me; there are no wires or clips on the new screen, only the multi-wire connecter that slides in. But I have no picture. What did I do wrong?
Pingback: Flat pieces and Netbook | Hot Studio - Hodaka Pottery
Also used this as a basis for the D260 and as previously stated, this was even easier! 2 screws and bezel pops off giving full access to screen, well chuffed 😀
I looked everywhere for good instructions to change out the screen on mine after my grand daughter stepped on it and yours is the only one that made any sense. I changed out my screen easily with your instructions but… the connector didn’t want to fit back into the back of the screen, I noticed it had previously been taped in, so I worked it in as best I could and then taped it down, not confident with that job, it seems too “scotch tape and bubble gum” to work well. But now the netbook doesn’t seem to want to boot. I get a connection to the screen, but no display. I am going to see if I messed something else up while trying to figure out how to get that doggone housing off, thanks for showing me where the hidden screws were, that was the problem…
carol
I have just replaced my screen, but i am getting an error saying windows does not recognise it.
Help, the screen work, it starts up and loads, then freezes.. 😦
Thanks.
But check your new screen before. Mine didn’t have any replacing plastic clips. I had to remove the black wire and reinstall on the new screen, without touching the white clips (micro and camera).
I’m sitting in a village called ‘Send’ near Guildford in Surrey (UK) felling pretty pleased with myself. I just used your guide to change the screen on my daughter’s Acer Aspire One after she smashed the old one with her thumb. Thanks for the help!
I have an Acer D150 with a loose wire somewhere in the screen, and as such, the colors are displaying incorrectly. I can fix the problem easily enough, but I’m worried that I might scratch the frame around the screen if I try prying off those pesky flush screw plugs on the bottom. Does anyone have any suggestions as to how I can do this without damaging anything else?
Thanks
Another very satisfied “customer”. Took me a while to find out how to get at the bottom screws – but the comments helped! This was all made very easy with the tutorial. I just wish I had less shaky hands for getting the screws in that hold the screen to the frame 😉
Next step – cleaning underneath the keys!
Thanks i just replace mine now thanks
the acer zg5 lcd is one of the most volatile piece of hardware.i accidentally left the power supply next to the laptop in my bag.next thing my screen crack.there is no display. does any1 know how to dismantle a zg5?i heard u just use a credit card n clip the hinges coincide with the keyboard frame, is tat true thx. a heap ur instruction legendary.
Thanks so much for sharing your experience, you’re still helping people out today.
Thank you for the excellent guidance. It really worked… and rather perfectly…
Thank you for this page…
This was a GREAT help, I got a new screen but the instructions were in Arabic, Hebrew, or something like that. These instructions were very easy to follow and the pics really helped save me!
THANKS SO MUCH–AWESOME!!!!
Fantastic that I found this. Cost me $51.95 on eBay (http://cgi.ebay.com/ws/eBayISAPI.dll?ViewItem&item=110640482379&ssPageName=ADME:L:OU:US:1123). I had some issues with getting the screws off the bezel, but no big deal in the end. Thanks for putting this out there!
Yay! Thanks so much! I fixed my netbook and I couldn’t have done it without your assistance. Bravo!!
Just wanted to let anyone know who had a model with only 2 screws, like a 532h, that you take out the 2 screws at the bottom sides, then you need to pry open the case at the hinge, from underneath like with the screen almost closed, then you just start unprying the screen and follow the rest of the instructions, which I looked for for my model & couldn’t find based on the fact of it’s having only the 2 screws, so I just wanted to post it somewhere to let everyone know that. Good luck.
Thanks so much for the guide! I had an old Acer Aspire One with a broken screen sitting under my bed for ages. I decided to fix it up as a spare and your guide was super helpful.
Cheers!
-Tony
LIFESAVER!
Thanks so much for posting this information. My 15 mo. old baby got a hold of the laptop, opened it, and promptly sat on the screen. I thought it was done for!
Thanks again!
Worked beautifully. Got the new screen from screencountry.com for $59 + shipping. Thanks.
Thanks a lot! this was extremely simple. I have an Aspire One D255E. The only difference on mine is that it only has two screws at the bottom, the rest of the cover is held by clips. Thanks again for the info
Thank you man, you are the King!! Regards from Zagreb, Croatia.
just joining the thank-you chorus.
acer d250-1838 here. love it. just rescued it after a stupid fall for a second time. thank you for your clear advice.
things were slightly different:
only four screws hold the frame together – top two corners below rubber and bottom two corners behind those annoying plastic covers. I got the covers off by pressing into the covers with a flathead screwdriver and turning to get the glue to separate. the little plastic covers are fairly trashed now, but it wasn’t hard to remove them once I committed to that method.
then inside, there were only two screws holding the LCD to its frame. it was necessary to remove both of them in order to get to the four side screws that got the LCD off.
there was only one connector for the one cable. it was taped down with clear tape and I recommend extreme care separating the edges of the tape and sliding the connector up and apart, without peeling the tape off entirely. so many tiny wires to break! the connector will click together when it’s seated properly.
anyway, it’s great to be typing to you on the patient itself. 🙂
Great tutorial! Instructions worked perfectly. Did have a little troublw getting the plastic bezel snapped back tightly at the bottom though…
You are the BEST. I just did it you ROCK. I have been without a computer for over a year. I thank you so much seriously. Have a great day.
Thanks for the help mate, am fixing an acer d150 for a customer and since it aint easy changing harware since there are so mane notebooks, netbooks. etc. tuhs came handy +.
Me says hi from Mexico
The one I just replaced was an Aspire One D255. There were only two screws on the screen bezel, one on the bottom left and one on the bottom right. After removing these screws, use your fingers to pry up on the plastic around the screen and start popping it up all the way around. The hinge covers are a part of this piece. The rest of the replacement is just as described above.
Thank you so much ! You saved me lot of money , before seeing this i had no idea how easy it would be to replace just the screen , i didn’t even know it was possible to do so. After reading your page i ordered a screen and replaced it myself in about 10 minutes! woo hoo! Thank you so much for showing me how! God Bless !
Thank you for this detailed and helpful tutoriial. I’d used the sellers one but the process where you remove side brackets on screen was ommited on theirs so i took off back screws and almost messed up!
Mr Fitzgerald:
Great Instructions.
Side Note: I graduated from Udub in 1960 when there was no computer science curriculum. So got a MS in EE which is really misleading. At that time they had one of the first computers in a University lab, an IBM 650 drum machine. Memory size was a lot less than 1 mbyte with no operating system. One user per hour, longer late at night. Made a living writing machine language code.
Hi, so i think last night it was pitch black and i accidentally stepped on my Acer laptop, and i opened it to found out that it had like a giant white mark that kindve looked like a bowie knife from Nazi Zombies (COD) and the screen was glitching. I dont want to do it myself becuz im stupid & very clumsy but what if i buy my own LCD on like Ebay & bring it to a repair shop(?) how much would it cost then? (plz reply!)
Probably about 50.00 US dollars or so. That was the quote I was given if you buy your own screen.
THANKS! It was a piece of cake. I only had one set of wires to connect and it was so easy. Thanks for your help!
If you have the model with the hideous plastic glued in covers at the bottom, just use a craft knife, scribe around the outside of the plastic piece and then just pop off.
Thanks made my job easy very similer to the 10″ aspire one
Dude, this post saved me. I probably could have figured it out but thanks for mapping it out. My screen had a big white rectangle in the middle 3rd of the screen, making my netbook unusable. Thanks!
Thank Your help! 🙂 You are great!
thanks a lot… this was kind of helping, but I have a bigger problem. Now, I need to open the whole computer to see what is going on with the LCD, I guess it has a false contact at the end of the band that is connected between the LCD and the rest of the computer.. I wish you could help me, thanks again! 🙂
My screen is very sensitive to the exact angle it’s opened to. I’m going to check the connections at the LCD end and if that doesn’t cure it try to get in side to look at the other end. If I have any luck I could get back to you.
THANK YOU! THANK YOU! THANK YOU!
Just for future reference for anyone who is wondering, not all Acer Aspire One’s have six screws. The steps above worked well, but it took my dad and I a while to figure out that his only had 4 screws, the two on the top corners and the two on the bottom corners.
But the overall information was great, we had changed the LCD on my HP laptop about 2 years ago but since this was smaller we wanted more instructions.
So thank you 🙂
where can i buy a 10.1 Wsvga Led for aspire one happy edition??
Thank you very much. It’s working again! As was mentioned by others, I would not bother disconnecting any wires. Just peel everything off the back and reattach. That said, thank you again for your easy, straightforward guide.
When replqacing screen I lost 2 of fhe very small hinge screws. Any Idea of where I migtfind some more??????thank you thank you
Lynn
Thanks, my 13 year old son folded his Acer with a book on the keyboard. He raked the yard this fall to pay for his screen. With your article and the nifty youtube video by fastvideotech (http://www.youtube.com/watch?v=CRw03PpRJfs&feature=related), my son was able to replace his screen with me only yelling at him a few times. He dug it, and it makes us want to fix more things! Man, it just worked when he turned it on, imagine that! Thanks, great post, and the comments were helpful too.
Found this very useful in removing my Acer Aspire One D250-1371. I was a little confused about the wire part and had to google that part, but figured it out. Thanks so much for posting this, it was VERY VERY useful! Now I just have to buy a replacement screen! 😀
Pingback: Sometimes I amaze myself… « Branch on Maybe
thanks…that was easy! Appreciate you taking the time to show these steps.
How do you remove the screen when their are no screws?
Thanks for taking the time to show the detailed guide! Really helped with the replacement of my screen. thank you very much…
Worked like a champion, saved my a few hundred dollars. Cheers for the tutorial!
Reblogged this on @ghoz21 Blog.
For those having difficulty exposing the lower two screws:
My grandson’s laptop had the two lower screws covered by the solid plastic inserts. To remove them, I placed the blade of a 1.4mm flat blade prcision screwdriver over where the screw would be and rotated it while pressing down. This effectively drilled into the plastic and enabled me to get through them and pry them out. The insert is about 0.25″ square and 0.020″ (0.5mm) thick. Then I used a #1 Phillips screwdriver to remove the screws. To free the bezel after removing the four screws, I placed the blade of the 1.4mm flat screwdriver into the uppler left hole and lifted up under the upper left edge of the hole. This lifted the outer edge of the bezel at the corner and enabled me to insert the flat blade of a larger screwdriver, and then slide that around the outer edges to unsnap the bezel from the cover, exposing the LCD screen. For those who find that not all of the screws were installed during factory assembly, and would like to add one or more, the screws in my grandsons model were M2.0x0.4 screws 4mm long. I was able to buy 100 of them on Amazon.com for $7.18 + shipping
My Acer Aspire one 721-3922 has no screws at all on the bazel. Instead there are 8 short rubber bits, very thin about 1/4″ long. I removed one and there is no screw, and no room for one, underneath. Other than these bits the bazel is smooth without any screw covers. Any ideas much appreciated. Thanks
For all you good folks, struggling with the “just pull off the rubber bits and remove the screws” thing, but have no screw in the bazel, this one’s for you! You have to get a credit card (or something of that nature) in along the seam b/w the bazel and the back cover. Slide it along and it will simply start to “unclip” as you move around the edges. simple as can be (once you know!). then follow on with these great instructions provided here! Cheers,
Many thanks to the host of this blog.
Now, for other users who have an issue with their Acer Aspire One, here are my additional observations which might add some clarity to the previous comments.
My Acer is the same identical one to the original blogger’s, which is an AOA150 (zg5) model with an 8.9 inch screen. So these comments apply specifically to that model, and may not really relate to some of the later models that look similar but have important differences.
1. To remove the 2 plastic screw covers on the bottom corners of the bezel, I used a standard switch blade box cutter/ utility knife. You just need to stick it under the outer edge of the plastic and pry, lift, push sideways or peel off. It is simply a sticker with adhesive underneath and it should come off easily. The adhesive should remain to stick back on when you reassemble.
2. The cable behind the screen is connected with a flat blade multi-wire CLIP connector, similar to many cell phone power cords. It is not merely “taped” on. There is tape on the back of the screen panel to hold the cable to the screen, and parts of the black cable have adhesive on the back which also stick the cable the the screen. You will have to VERY CAREFULLY peel the tape and the cables from the back of the screen as you tilt the screen out and away from the top half of the laptop. In other words, you leave the bottom edge of the screen as is, and tilt the top of the screen towards you (towards the keyboard) as the the screen is upright. You can use a plastic credit card or a flat blade screwdriver to peel the cable, but you may need to use your fingers to peel off the piece of black plastic tape which is taped over the video connection. Keep in mind that this cable is clipped at the top to the camera and mic (which I did not unclip), so the screen will only pull out about an inch before you unstick the cable. Be very gentle because the cable will stretch a little but you could tear the tiny wires. Once you can tilt the screen completely face down, you will see the video connection in the back. You unclip this cable by pulling the clear plastic tab on the cable parallel to the back of the screen and in the direction of “down” or towards the bottom edge of the screen. Picture this as placing your hand behind the screen and wiping downward to understand the direction.You need to pull a little hard but gently and the cable will come out. To reconnect to the new screen you just do the reverse. Line up the blades on the sides of the cable into the grooves of the screen jack and push in until it clicks on both ends.
3. I ordered a brand new screen by LG model LG LP089WS1 (TL)(A1), as some others have reported. When I turned on the machine to try it, I got the white screen like many others. Also, the screen would not turn off by using the Fn-F6 key as expected, and the keyboard brightness and contrast controls had no effect. And the worst part was that the screen in the only fixed setting it displayed was VERY dark and dim. I could only figure that the screen was not 100% compatible, even though many people and sellers claim this is the correct part. I then ordered a used screen from ebay with the identical part number from my original screen (Samsung), which appears to be the same screen the blogger has. This one works correctly in all respects, the same as the original.
I have an Acer laptop that looks just like the one in the picture… although i did not see a screw next to the acer logo to take off the back plastic sheath. it fell from one of my small shelves and i didnt know and stepped on it in the middle of the night. most of the screen is cracked and damaged… where do i find my screen replacment?
oh and there were no screws on the front of the screen either =(
Does anyone know where I can find those gold screw backings that the front screws screw into? This is what I’m talking about: https://bespokeblog.files.wordpress.com/2009/10/acer_lcd_top_wires.jpg?w=300&h=225
My customer dropped his Aspire and a couple of the screw backings fell out so I need to replace them. Thanks!
It was very easy to disassemble the LCD screen but now I have a problem my new LCD screen now is very black I cant see nothing unless I put it under a light then I can see barely or by side. I don’t know if do something wrong because I doubt the Flex is alright.
thx! worked great – good job!
It was just as you said – Thanks a million!
Thanks for the tutorial. Worked like a charm—but when I finished the install, my brightness control (fn +) gave me two settings—full bright or ‘somewhat dim’. No scaling….either full bright or dim…..and the laptop seems to use more power than it had consumed previously (battery drain seems much more accelerated). Any ideas on why this might be the case? I’m pretty sure all contacts were good when i plugged it back in….. have tried reloading driver without success, as well as Launch manager (Acer program), but haven’t found a solution. I don’t want to take it back apart, because it is usable as is, but any input would be appreciated.
Pingback: Acer Aspire One AOD255E-13492 | Most Popular Netbook | Most Popular Netbook
Nice tutorial! While the device differed a bit from mine, I was able to follow it well enough to successfully replace my display. I have an Aspire One D250 and I thought I would share some extra details about the job on this model for anyone that might come after.
– The D250 has only four screws holding the plastic bezel (they are the four corners of the bezel) The other two rubber covers don’t have to be removed as there is just plastic behind them. Also the two lower covers are not rubber but plastic that is flush with the bezel. They can be tricky to remove but that is where a good set of metal spudgers become worth their price.
– Speaking of spudgers, having a nice set from iFixit or somewhere else really helps with removing the bezel without breaking the clips. Both nylon and metal.
– There are two clips that will have to be broken as I saw no way to remove the lower screws of the inner L-bracket without pushing them downward. They are tiny clips and they are next to the lower bezel screws so I have not noticed any decrease in stability upon reassembly. Perhaps they were not in front of the screws on the authors model but on the D250, there is no way to work around them.
What if I forgot to remove the battery before switching out the LCD´s? Because now my laptop won’t turn on.
I’ll be trying this today. Thank you for sharing, nfitzgerald! =)
Thanks alot. This was almost close to the problem I had with my LCD and is very helpful.
http://ss2k.philippteister.com
Thanks a lot. The hardest part was perhaps removing the plastic sheath (it wasn’t super-obvious how to pry it out that without breaking it). Other than that .. really a breeze.
Thanks again.
Giampiero